
Yes! YOU can make these crazy useful over the door hooks to hang decorations and wreaths outside, or anything you need a hook for indoors. This time of year there are plenty of holidays to decorate for. The best part about these hooks is that they are quick and easy to make, took me about 45 minutes including painting (not including drying time) and cost relatively little, coming in as low as $4 each when you make a set of three and buy similar materials. This guide will show you how!
What’s it take? Here’s a complete list of materials:
(prices listed are what I paid at the local home improvement store today – not including sales tax)
- 1 x strip of metal, I used a 3/4″ wide strip of 12 gauge steel that is 48″ long though thinner metal would mean less gap needed above the door for the hook to fit but also less weight it will hold (cost: $6.49US)
- 1 x can of spray paint (White in my case but any color that will look good on your door or behind your wreath will work) (cost: $4.18US)

That’s it! And you will have approximately 2/3 of the can of spray paint left over. If you have some spray paint already laying around that you can use, these hooks just got that much cheaper!
So Where Do I Start? Safety First:
As you will be working with metal which can often be sharp and using an aerosol paint, I recommend the following safety items for this project:
- Safety Glasses
- Leather Work Gloves

If you don’t have any on hand, you can order some from the Amazon links at the bottom of this post or pick some up at your local hardware store.
Note: Project was completed out doors. If working indoors, additional protective equipment may be necessary when working with aerosol paints.
OK, I’m Protected, What Else Do I Need? Required Tools:
- Straight nose pliers with the straight wire cutter (Linesman pliers)
- Pencil or marker to mark the steel strip, a marker will be easier to see
- Tape measure

That’s it! Just these few simple tools which you likely have already will have you tackling this project with ease.
Let’s Get Busy! The Build Steps:
-
Cutting the metal strip into bend ready segments
- From one end of the metal strip, use the tape measure and make a mark at 16 inches and a second mark at 32 inches.

Marked at 16″ and 32″ will give us three 16″ metal strips - Using the pliers, place the steel strip into the cutting region of the pliers at the 16 inch mark and squeeze a bit. You are not trying to cut through the strip, just make a nice indent in it to be the weak area for bending and breaking it off. Do this from both sides of the strip to make a nice and even indentation.

Indent with straight cutters, just making an indentation, not trying to cut through. Remember to indent from both sides! 
Look at that fine indentation! - Now with the flat part of the pliers held in one hand, grip along the indentation, then with your free hand (the hand NOT holding the pliers), grasp the strip on the opposite side of the indentation but close to the pliers and bend the strip steel at the indentation toward you and then away several times. The strip should break apart along the indentation.

Separated after just a couple bends. - Repeat this process with the 32 inch mark. Once done, you should have 3 equal length strips about 16 inches long.

We now have 3 relatively equal strips, each 16 inches long.
- From one end of the metal strip, use the tape measure and make a mark at 16 inches and a second mark at 32 inches.
-
Bending The Strips Into Decoration Holding Hooks
- Using the tape measure, make a mark at 3 inches and a second mark at 5 and 1/4 inches on each of the three strips

3 inches for the flat against the door, another 2 and 1/4 inches for the door thickness and some wiggle room. - Take one strip, place the flat part of the pliers near the 3 inch mark, grasp the longer portion of the strip with your free hand very near the pliers placing your thumb on the outside top of the pliers as pictured and bend the strip upwards approximately 90 degress, it will make a right angle or the corner of a square

Gloves are vital to protected hands! - Now move the pliers to the 5 and 1/4 inch mark with the 3 inch leg pointing up. Grasp the longer potion again and with your free hand very near the pliers placing your thumb on the outside top of the pliers as pictured above, bend the strip upwards approximately 90 degress, it will make a right angle or the corner of a square. [Note: Picture below shows placement near second mark from the bottom side of the pliers, the bend would be downward from this perspective.]

Making the second bend. - You should now have the hook end which goes over the top of the door and will look like this pictured here.

Over the door part complete - Now, to form the curved hook which will hold a wreath or other decorations, grip the end of the longer leg in the pliers from the side, grasp the same leg with your free hand and using your thumb against the strip with a twisting motion of the pliers make many small slight bends going the opposite direction as the square hook already made. Slide your hand up the leg away from the pliers a small amount after each bend until your thumb is a about 3 inches from the pliers. Repeat several times, forming up the curve over multiple passes

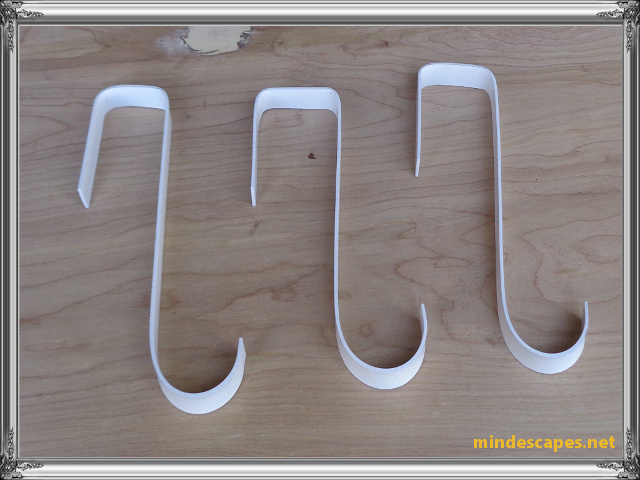
Remember: Just a little bend at a time, moving thumb from pliers away multiple times to make a steady curve - Repeat the process with the remaining 2 strips and you will end up with 3 over the door hooks as pictured, each between 8 and 9 inches long.

Three hooks between 8 and 9 inches long!
- Using the tape measure, make a mark at 3 inches and a second mark at 5 and 1/4 inches on each of the three strips
-
Applying the Paint
- Prior to painting it is a good idea to wash the hooks with a mild detergent, something like dish soap, to remove any oil coating that may have been applied to the metal for protection and dry them thoroughly
- When spray painting, follow the instructions and precautions indicated on your spray can. Make multiple light passes to avoid runs. Apply multiple coats (at least 2) and let the hooks dry completely before using them.

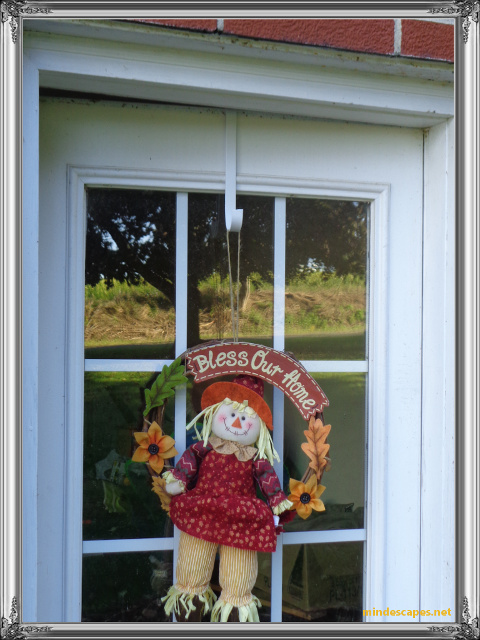
Decoration Holders Ready For Duty!
That’s it! You now have 3 over the door wreath/decoration holders to enjoy! Pictured here is one of the three I made holding one of our fall decorations.
Since these hooks are custom made by you, the measurements can be adjusted as needed to get the proper length or proper spacing for the thickness of your door. Just remember that you may not get as many hooks if you make them longer which raises the per hook cost. Total out of pocket for this project was less than $12 US since I already had the tools.
If you aren’t able to find everything at your local hardware or don’t have time to drive there and find out, everything you need can be ordered using the Amazon links below!
Thanks for reading and enjoy your hooks!
Amazon Links
-
- Materials:
- Safety Gear:
- Tools:
- Materials:


© 2018 – James Sponseller – mindescapes.net
